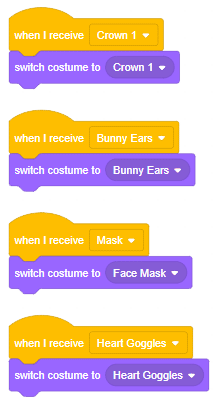
The function is used to draw a text string on any image.
Parameters
Name
Type
Description
Expected Values
Default Value
image
string
It is the image on which text is to be drawn.
Image
text
string
Text string to be drawn.
String
org
list
It is the coordinates of the bottom-left corner of the text string in the image. The coordinates are represented as tuples of two values i.e. (X coordinate value, Y coordinate value).
(X coordinate value, Y coordinate value)
font
string
It denotes the font type. Some of font types are FONT_HERSHEY_SIMPLEX, FONT_HERSHEY_PLAIN, , etc.
FONT_HERSHEY_SIMPLEX
fontScale
int
Font scale factor that is multiplied by the font-specific base size.
1-5
2
color
list
It is the color of text string to be drawn. For BGR, we pass a tuple. eg: (255, 0, 0) for blue color.
(R, G, B)
(255, 0, 0)
thickness
int
It is the thickness of the line in px.
1-10
lineType
int
This is an optional parameter.It gives the type of the line to be used.
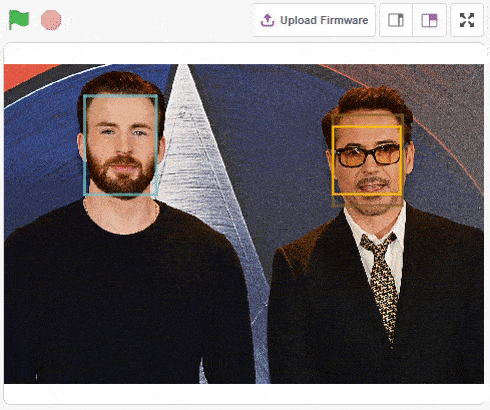
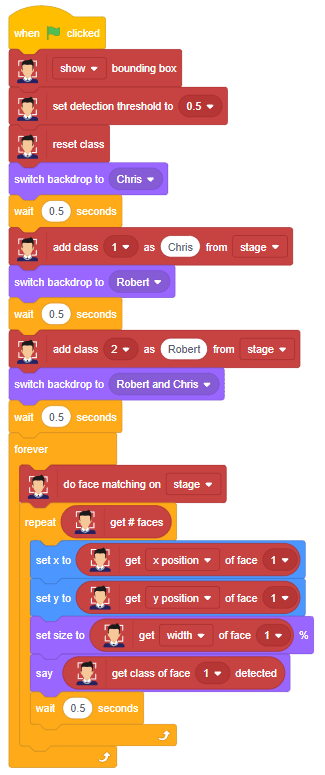
The example demonstrates the application of face recognition with stage. Following are the key steps happening:
Initializing the program with parameters for the sprite and face detection library.
Saving Chris's face as class 1.
Saving Robert's face as class 2.
Running face recognition and placing the square box sprite on the faces of Chris and Robert.
Code
sprite = Sprite('Square Box')
fd = FaceDetection()
import time

fd.setthreshold(0.5)
fd.enablebox()

# Reset Database
fd.deleteallclass()

# Adding Chirs face to database
sprite.switchbackdrop("Chris")
time.sleep(0.5)
fd.addclassfromstage(1, "Chris")

# Adding Robert face to database
sprite.switchbackdrop("Robert")
time.sleep(0.5)
fd.addclassfromstage(2, "Robert")

sprite.switchbackdrop("Robert and Chris")

while True:
  fd.recognisefromstage()

  print(fd.count())
  for i in range(fd.count()):
    sprite.setx(fd.x(i+1))
    sprite.sety(fd.y(i+1))
    sprite.setsize(fd.width(i+1))
    sprite.say(getclassname(i+1))
    time.sleep(1)
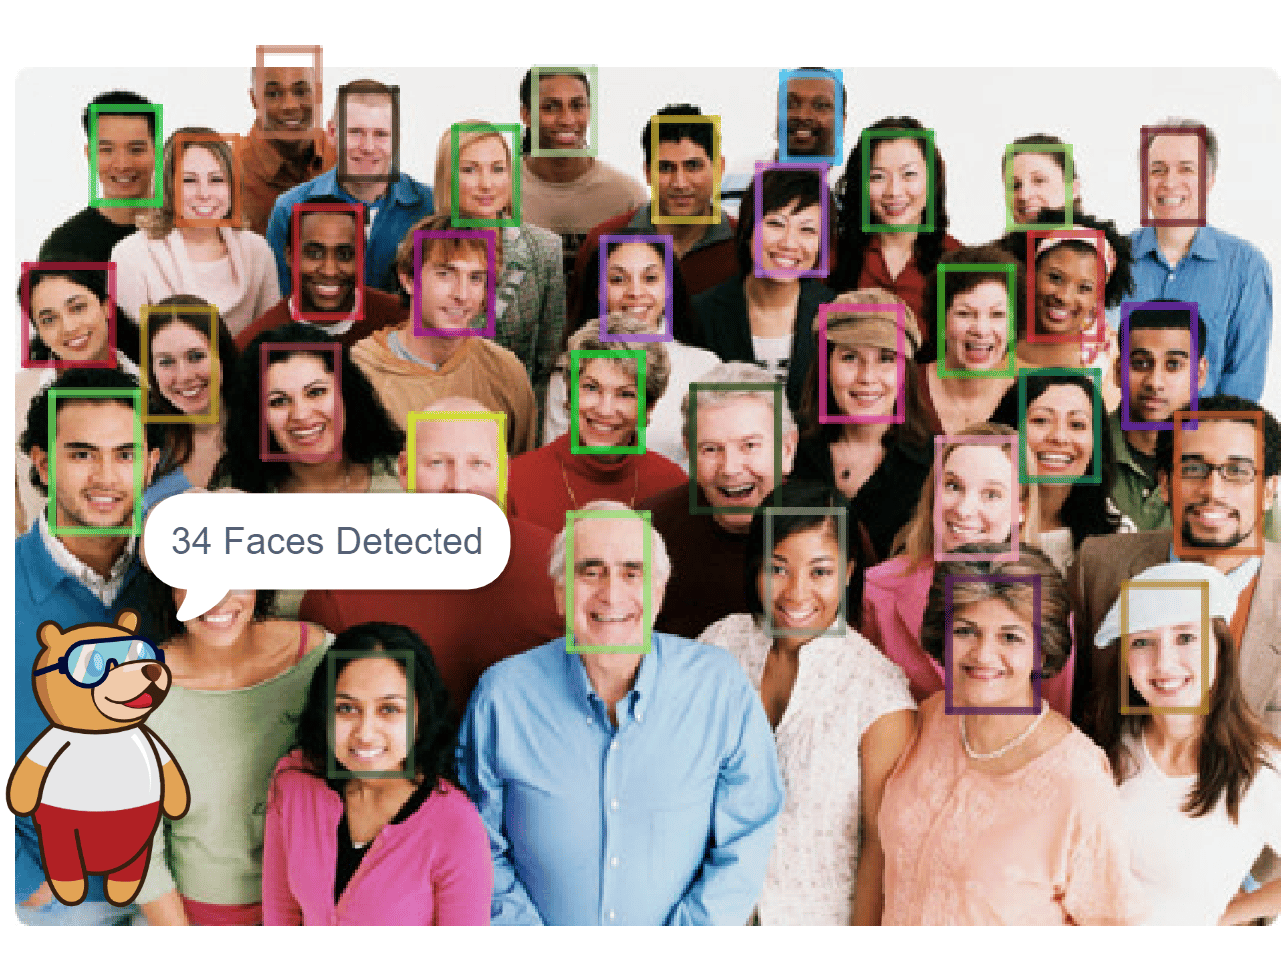
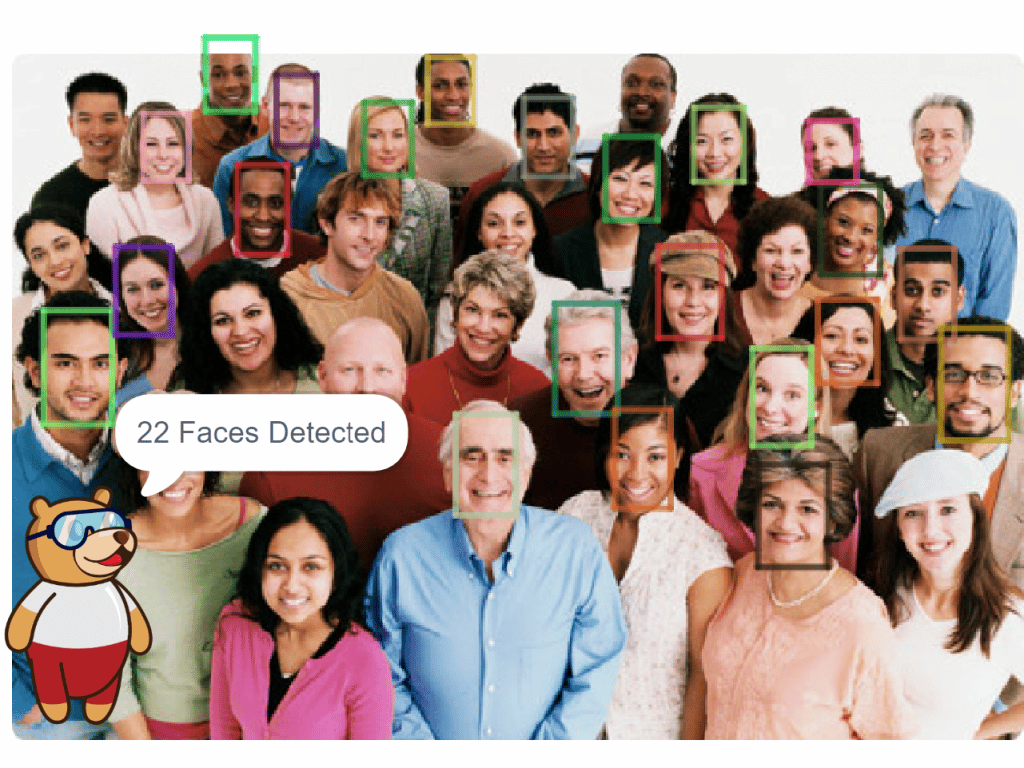
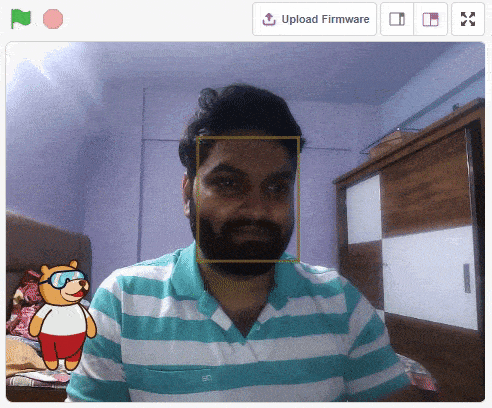
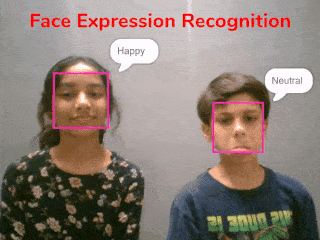
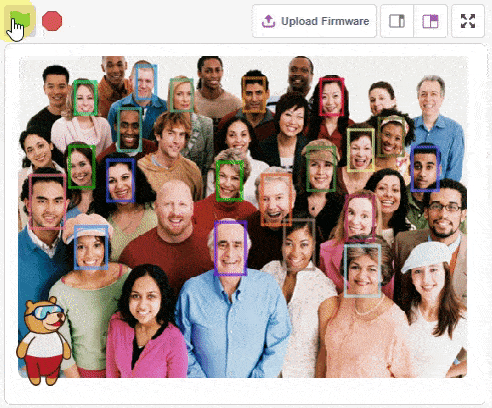
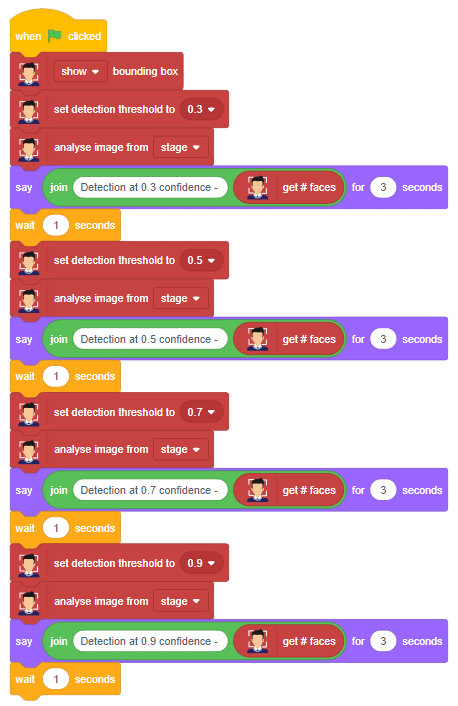
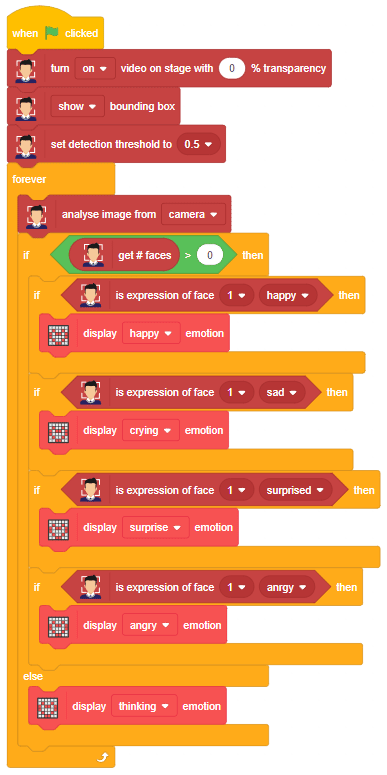
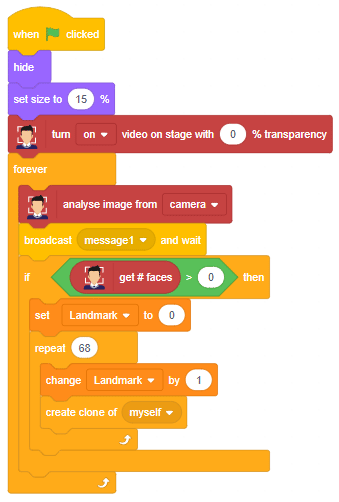
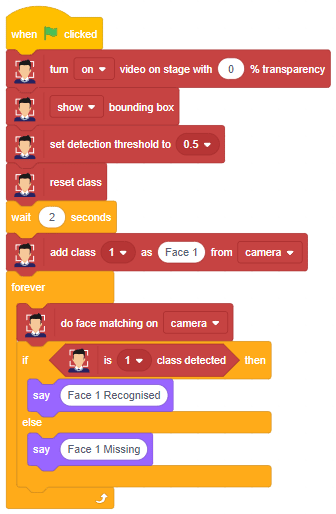
The example demonstrates how to use face detection with a camera feed. Following are the key steps happening:
Initializing the program with parameters for the sprite, and face detection library.
Running face detection.
Running the loop to show every face and expression.
Code
sprite = Sprite('Square Box')
import time
fd = FaceDetection()

fd.video("on", 0)

# Enable Bounding Box on the stage
fd.enablebox()

# Set Theshold of the stage
fd.setthreshold(0.5)

while True:
  fd.analysestage()

  for i in range(fd.count()):
    sprite.setx(fd.x(i + 1))
    sprite.sety(fd.y(i + 1))
    sprite.setsize(fd.width(i + 1))
    sprite.say(fd.expression(i + 1))
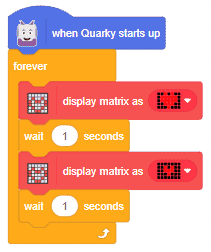
from quarky import *
import time

while True:
	quarky.drawpattern("jjbjbjjjbbbbbjjbbbbbjjjbbbjjjjjbjjj")
	time.sleep(1)
	quarky.drawpattern("jjjjjjjjjbjbjjjjbbbjjjjjbjjjjjjjjjj")
	time.sleep(1)
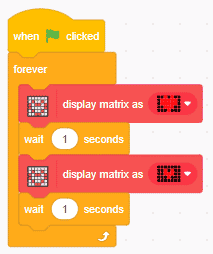
# This python code is generated by PictoBlox

from quarky import *
# This python code is generated by PictoBlox

# imported modules
import time


while True:
	quarky.drawpattern("jjbjbjjjbbbbbjjbbbbbjjjbbbjjjjjbjjj")
	time.sleep(1)
	quarky.drawpattern("jjjjjjjjjbjbjjjjbbbjjjjjbjjjjjjjjjj")
	time.sleep(1)
####################imports####################
#do not change
import cv2
import numpy as np
import tensorflow as tf
sprite = Sprite("Tobi")
#do not change
####################imports####################
#Following are the model and video capture configurations
#do not change
model = tf.keras.models.load_model('saved_model.h5',
custom_objects=None,
compile=True,
options=None)
cap = cv2.VideoCapture(0) # Using device's camera to capture video
text_color = (206, 235, 135)
org = (50, 50)
font = cv2.FONT_HERSHEY_SIMPLEX
fontScale = 1
thickness = 3
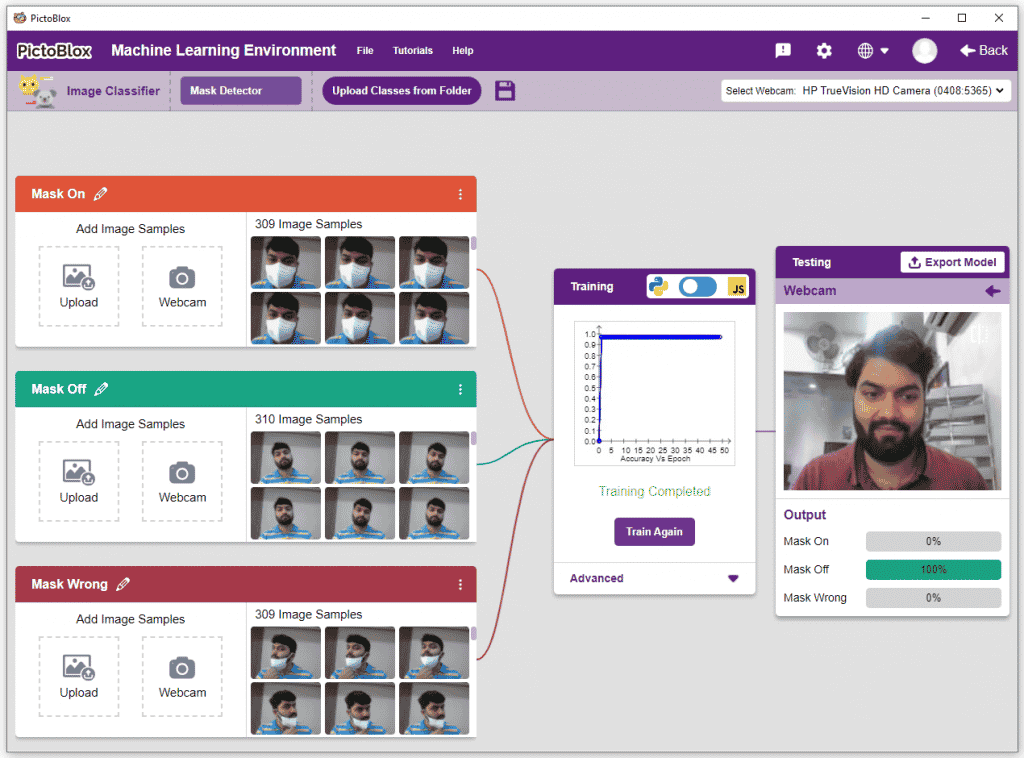
class_list = ['Mask Off', 'Mask On', 'Mask Wrong'] # List of all the classes
#do not change
###############################################
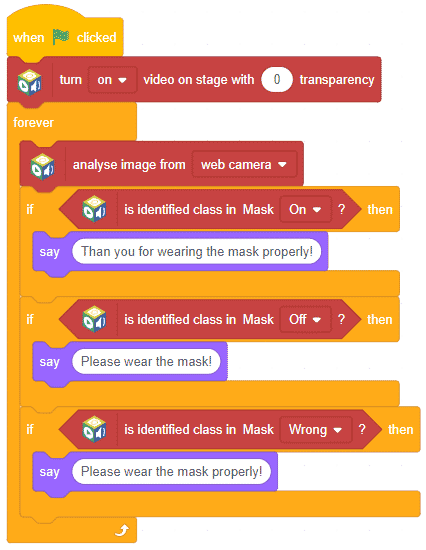
def checkmask(predicted_class):
if predicted_class == 'Mask On':
sprite.say("Thank you for wearing the mask")
elif predicted_class == 'Mask Off':
sprite.say("Please wear a mask")
else:
sprite.say("Please wear the mask propertly")
#This is the while loop block, computations happen here
while True:
ret, image_np = cap.read() # Reading the captured images
image_np = cv2.flip(image_np, 1)
image_resized = cv2.resize(image_np, (224, 224))
img_array = tf.expand_dims(image_resized,
0) # Expanding the image array dimensions
predict = model.predict(img_array) # Making an initial model prediction
predict_index = np.argmax(predict[0],
axis=0) # Generating index out of the prediction
predicted_class = class_list[
predict_index] # Tallying the index with class list
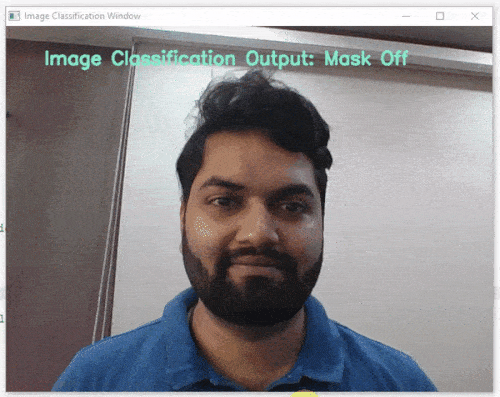
image_np = cv2.putText(
image_np, "Image Classification Output: " + str(predicted_class), org,
font, fontScale, text_color, thickness, cv2.LINE_AA)
print(predict)
cv2.imshow("Image Classification Window",
image_np) # Displaying the classification window
checkmask(predicted_class)
if cv2.waitKey(25) & 0xFF == ord(
'q'): # Press 'q' to close the classification window
break
cap.release() # Stops taking video input
cv2.destroyAllWindows() #Closes input window
####################imports####################
#do not change
import cv2
import numpy as np
import tensorflow as tf
#do not change
####################imports####################
#Following are the model and video capture configurations
#do not change
model = tf.keras.models.load_model('saved_model.h5',
custom_objects=None,
compile=True,
options=None)
text_color = (206, 235, 135)
org = (50, 50)
font = cv2.FONT_HERSHEY_SIMPLEX
fontScale = 0.5
thickness = 1
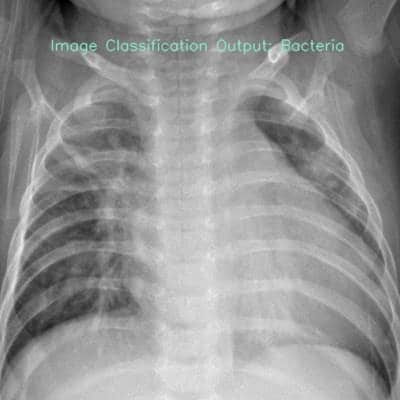
class_list = ['Bacteria', 'Normal', 'Virus'] # List of all the classes
#do not change
###############################################
image_np = cv2.imread("test.jpg", cv2.IMREAD_COLOR)
image_resized = cv2.resize(image_np, (224, 224))
img_array = tf.expand_dims(image_resized,
0) # Expanding the image array dimensions
predict = model.predict(img_array) # Making an initial model prediction
predict_index = np.argmax(predict[0],
axis=0) # Generating index out of the prediction
predicted_class = class_list[
predict_index] # Tallying the index with class list
image_np = cv2.putText(image_np,
"Image Classification Output: " + str(predicted_class),
org, font, fontScale, text_color, thickness,
cv2.LINE_AA)
print(predict)
cv2.imshow("Image Classification Window",
image_np) # Displaying the classification window
cv2.imwrite("TestResult.jpg", image_np)
cv2.waitKey(0)
cv2.destroyAllWindows()