analysecamera()

Function Definition: analysecamera()

Description

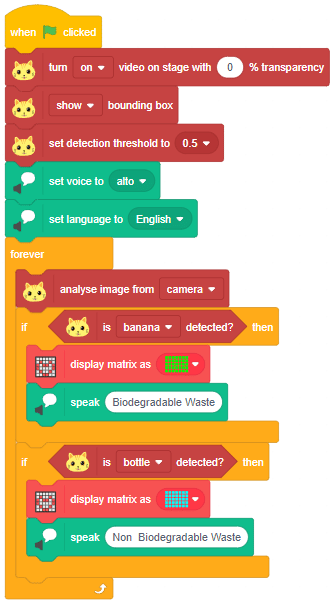
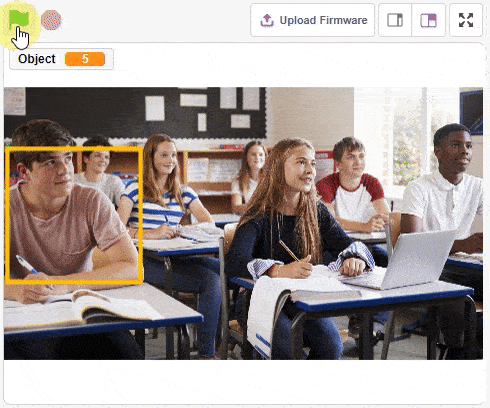
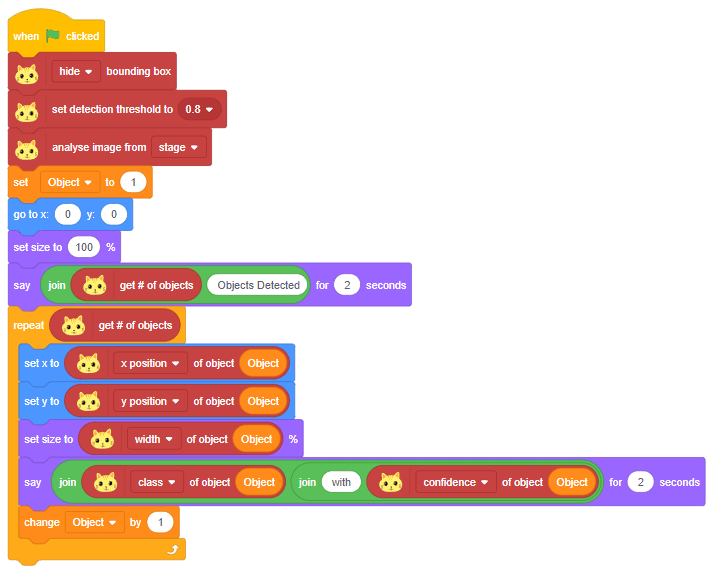
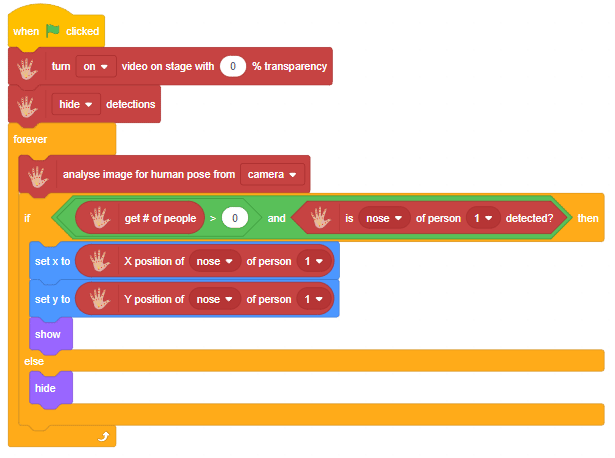
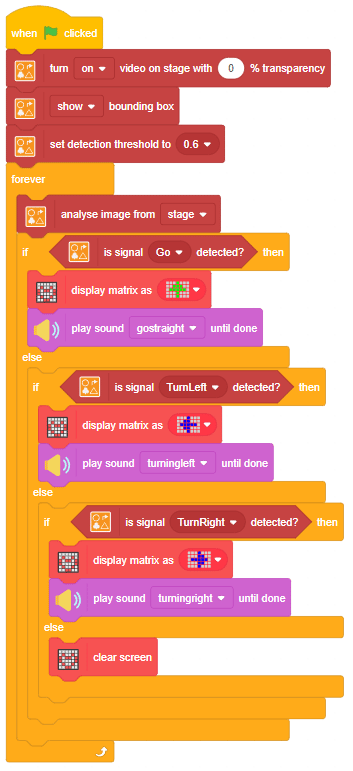
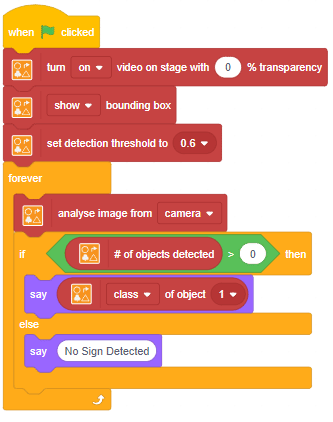
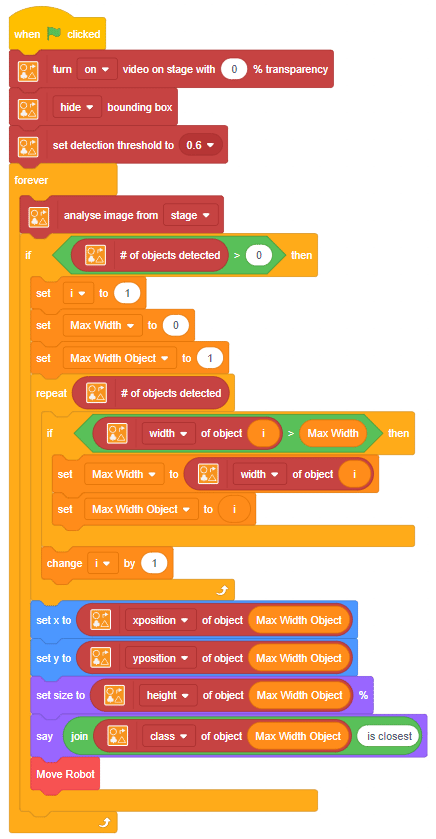
This function is used to analyze the image received as input from the camera, for the feature.

By analyzing the images for image features, you can recognize the following things:

  1. Brands: Brand detection uses a database of thousands of global logos to identify commercial brands in images. The Computer Vision service detects if there are brand logos in a given image; if so, it returns the brand name; else, it returns NULL.
    Brands
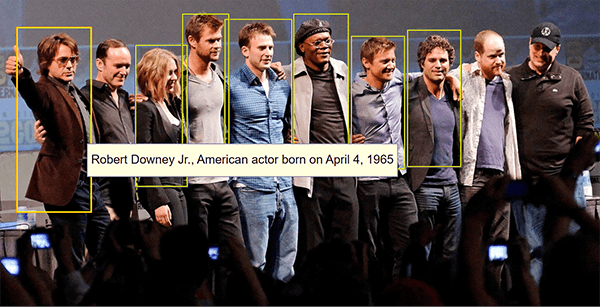
  2. Celebrity: Celebrity detection uses a database to identify celebrities in images. The Computer Vision service detects if there is a celebrity in a given image; if so, it returns their name; else, it returns NULL.
    Celebrity
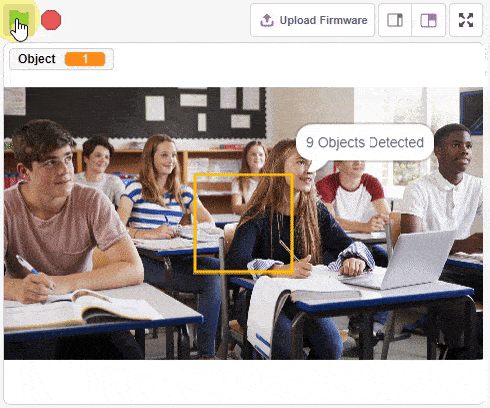
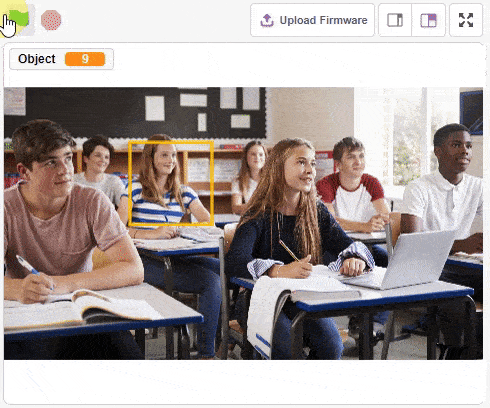
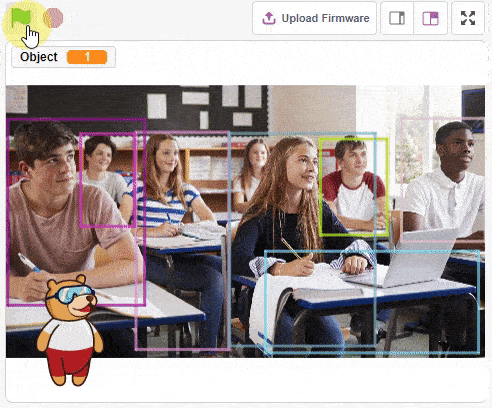
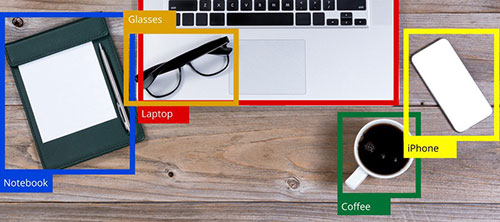
  3. Objects: Computer vision detects if there are objects in a given image; if so, it returns their name; else, it returns NULL.
    Object Detection
  4. Landmarks: Landmark detection uses a database of thousands of global landmarks to identify them in images, e.g., the Taj Mahal.
    Taj Mahal 2
  5. Image Tags: Computer vision returns the taxonomy-based categories detected in an image. Computer Vision can categorize an image broadly or specifically according to the 86 categories given in the following diagram:
    Category Tags
  6. Image Description: Human-readable sentence that describes the contents of the image.

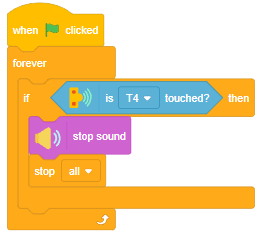
Alert: This block processes the image input and updates the values in the other functions hence it needs to be put inside loops while making projects.

Parameters

Example

The example demonstrates using the Quarky touch display to make touch piano.

Script


Output

Touch-Numbers

The example demonstrates how to run different actions with the Quarky touch sensor to make a disco party in PictoBlox.

Script

Output

The example demonstrates how to use an ultrasonic sensor with Quarky.

Connections

Now we will connect the Ultrasonic Sensor to the Robot. The sensor and the robot have the following pins:

  1. Ultrasonic Sensor Pins:
    1.  VCC
    2. GND
    3. Trig
    4. Echo
  2. Quarky Pins:
    1. GND
    2. V
    3. D1
    4. D2

We will start with connecting the ultrasonic sensor with Quarky using the 4 set wire provided in the kit. But, first, make the connection in the following way:

  • First, connect the VCC of the ultrasonic sensor with the V pin on the Quarky.
  • Connect the GND of the ultrasonic sensor with the Ground pin on the Quarky.
  • Connect Trig of the ultrasonic sensor with D1 pin on the Quarky.
  • Finally, connect the Echo of the ultrasonic sensor with the D2 pin on the Quarky.

Script

Output

The example demonstrates how to make the sprite movement with Quarky buttons.

Code

sprite = Sprite('Tobi')
quarky=Quarky()

while True:
  if quarky.readpushbutton("L"):
    sprite.move(-10)
  elif quarky.readpushbutton("R"):
    sprite.move(10)

Output

The example demonstrates using the Quarky touch display to make a touch piano in the Python Coding Mode.

Code

sprite = Sprite('Tobi')
quarky = Quarky()

while True:
  if quarky.ispadtouched("T1"):
    quarky.drawpattern("bbbjjbjjbjjbbjjbjjjbjjbjjjbjjbjjbbb")
    quarky.playtone("C4", 8)

  if quarky.ispadtouched("T2"):
    quarky.drawpattern("cccjcccjcjjjjcjcjjcccjcjjcjjjcjjccc")
    quarky.playtone("D4", 8)

  if quarky.ispadtouched("T3"):
    quarky.drawpattern("fffjfffjfjjjjfjfjjfffjfjjjjfjfjjfff")
    quarky.playtone("E4", 8)

  if quarky.ispadtouched("T4"):
    quarky.drawpattern("dddjdjdjdjjdjdjdjjdddjdjjjjdjdjjjjd")
    quarky.playtone("F4", 8)

  if quarky.ispadtouched("T5"):
    quarky.drawpattern("gggjgggjgjjgjjjgjjgggjgjjjjgjgjjggg")
    quarky.playtone("G4", 8)

Output

The example demonstrates how to use an ultrasonic sensor with Quarky.

Connections

Now we will connect the Ultrasonic Sensor to the Robot. The sensor and the robot have the following pins:

We will start with connecting the ultrasonic sensor with Quarky using the 4 set wire provided in the kit. But, first, make the connection in the following way:

  • First, connect the VCC of the ultrasonic sensor with the V pin on the Quarky.
  • Connect the GND of the ultrasonic sensor with the Ground pin on the Quarky.
  • Connect Trig of the ultrasonic sensor with D1 pin on the Quarky.
  • Finally, connect the Echo of the ultrasonic sensor with the D2 pin on the Quarky.

Code

sprite = Sprite('Tobi')
quarky = Quarky()

quarky.setultrasonicpins(1, 18, 19)
while True:
  sprite.say(quarky.getdistance(1))


Output

The example demonstrates how to run different actions with the Quarky touch sensor to make a disco party in Python Coding Environment.

Code

sprite = Sprite('Cassy Dance')
quarky = Quarky()

import time

sprite.switchcostume('cassy-a')
sprite.gotoxy(0, 0)

while True:
  if quarky.ispadtouched("T1"):
    quarky.playsound("QuarkyIntro")

  if quarky.ispadtouched("T2"):
    quarky.showpattern("party colors")

  if quarky.ispadtouched("T3"):
    time.sleep(0.2)
    sprite.nextcostume()

  if quarky.ispadtouched("T4"):
    quarky.stopaudio()

Output

A waste management system that will differentiate the waste based on its type. If it detects biodegradable waste, the LEDs Quarky’s matrix will turn green. If it’s non-biodegradable waste, the LEDs will turn blue.

Script

Output

The example demonstrates how to run an object detection on the stage and show all the objects with confidence.

Script

Output

  1. Detection at 0.3
  2. Detection at 0.5
  3. Detection at 0.8
The example demonstrates how to detect persons on the stage with different confidence thresholds.

Script

Output

waste
A waste management system that will differentiate the waste based on its type in Python Coding Environment. If it detects biodegradable waste, the LEDs Quarky’s matrix will turn green. If it’s non-biodegradable waste, the LEDs will turn blue.

Code

sprite = Sprite('Tobi')
od = ObjectDetection()
speech = TexttoSpeech()
quarky = Quarky()

od.video("on", 1)
od.enablebox()
od.setthreshold(0.5)

speech.setvoice('alto')
speech.setlanguage('en')

while True:
  od.analysecamera()
  
  if od.isdetected('banana'):
    quarky.drawpattern("ccccccccccccccccccccccccccccccccccc")
    speech.speak("Biodegradable Waste")
  
  if od.isdetected('bottle'):
    quarky.drawpattern("fffffffffffffffffffffffffffffffffff")
    speech.speak("Non Biodegradable Waste")

Output

waste

The example demonstrates how to run an object detection on the stage and show all the objects with confidence.

Code

sprite = Sprite('Square Box')
obj = ObjectDetection()

obj.disablebox()
obj.setthreshold(0.5)
obj.analysestage()

sprite.gotoxy(0, 0)
sprite.setsize(100)
sprite.say(str(obj.count()) + " Object Detected", 2)

for object in range(1, obj.count() + 1):
  sprite.setx(obj.x(object))
  sprite.sety(obj.y(object))
  sprite.setsize(obj.width(object))
  sprite.say(obj.classname(object) + " with " + str(obj.confidence(object)), 2)

Output

  1. Detection at 0.3
  2. Detection at 0.5
  3. Detection at 0.8
The example demonstrates how to detect persons on the stage with different confidence thresholds.

Code

sprite = Sprite('Tobi')
obj = ObjectDetection()

obj.enablebox()
sprite.gotoxy(-180, -110)
sprite.setsize(100)

obj.setthreshold(0.3)
obj.analysestage()
sprite.say(str(obj.detectedcount("person")) + " Person Detected at 0.3 Threshold", 2)

obj.setthreshold(0.5)
obj.analysestage()
sprite.say(str(obj.detectedcount("person")) + " Person Detected at 0.5 Threshold", 2)

obj.setthreshold(0.9)
obj.analysestage()
sprite.say(str(obj.detectedcount("person")) + " Person Detected at 0.9 Threshold", 2)

Output

The examples show how to use Pose Recognition in PictoBlox to count the number of body parts detected in the body.

Script

Output

The example demonstrates how to use hand recognition and pen extensions to make an air draw game.

Script

Output

The example demonstrates how to use hand recognition to track the different parts of the fingers.

Script

Output

The example demonstrates how to use human body detection to track the nose and make someone clown.

Script

Output

The example demonstrates how to use hand recognition to track the different parts of the fingers in Python Coding Environment.

Code

thumb = Sprite('Thumb')
index = Sprite('Index')
middle = Sprite('Middle')
ring = Sprite('Ring')
pinky = Sprite('Pinky')

hand = Posenet()
hand.video("on", 0)
hand.enablebox()

thumb.switchcostume("ball-a")
thumb.setsize(50)
index.switchcostume("ball-b")
index.setsize(50)
middle.switchcostume("ball-c")
middle.setsize(50)
ring.switchcostume("ball-d")
ring.setsize(50)
pinky.switchcostume("ball-e")
pinky.setsize(50)

while True:
  hand.analysehand()
  
  if hand.ishanddetected():
    thumb.setx(hand.gethandposition(1, 4))
    thumb.sety(hand.gethandposition(2, 4))
    thumb.show()
    
    index.setx(hand.gethandposition(1, 8))
    index.sety(hand.gethandposition(2, 8))
    index.show()
    
    middle.setx(hand.gethandposition(1, 12))
    middle.sety(hand.gethandposition(2, 12))
    middle.show()
    
    ring.setx(hand.gethandposition(1, 16))
    ring.sety(hand.gethandposition(2, 16))
    ring.show()
    
    pinky.setx(hand.gethandposition(1, 20))
    pinky.sety(hand.gethandposition(2, 20))
    pinky.show()
  
  else:
    thumb.hide()
    index.hide()
    middle.hide()
    ring.hide()
    pinky.hide()

Output

The examples show how to use Pose Recognition in PictoBlox to count the number of body parts detected in the body in Python Coding Environment.

Code

sprite = Sprite('Tobi')
pose = Posenet()

pose.video("on", 0)
pose.enablebox()

while True:
  pose.analysecamera()
  bodyPartCount = 0
  
  for i in range(21):
    if pose.isdetected(i, 1):
      bodyPartCount += 1
  
  sprite.say(str(bodyPartCount) + " Parts Detected")

Output

The example demonstrates how to use human body detection to track the nose and make someone clown.

Code

sprite = Sprite('Ball')
pose = Posenet()

pose.video("on", 0)
pose.enablebox()

while True:
  pose.analysestage()
  
  if (pose.isdetected(0, 1)):
    sprite.setx(pose.x(0, 1))
    sprite.sety(pose.y(0, 1))
    sprite.show()
  
  else:
    sprite.hide()

Output

The example demonstrates how to use hand recognition and pen extensions to make an air draw game in the Python Coding Environment.

Code

sprite = Sprite('Pencil')

hand = Posenet()
pen = Pen()

hand.video("on", 0)
hand.disablebox()

pen.clear()
pen.setcolor([0, 255, 0])
pen.setsize(2)

while True:
  hand.analysehand()
  if hand.ishanddetected():
    if sprite.iskeypressed("space"):
      pen.down()
      sprite.setx(hand.gethandposition(1, 8))
      sprite.sety(hand.gethandposition(2, 8))
    else:
      pen.up()

Output

The example demonstrates how to use sign detection and make the Quarky show the detection on the LED.

Script

Output

The example demonstrates how to implement sign detection in PictoBlox.

Script

Output

The example demonstrates how to find the closest sign from multiple sign detection and make the decision accordingly.

Script

Output

The example demonstrates how to make an object-tracking robot.

Script

Output

Speech Recognition
The example demonstrates how to make smart home automation for light control using NLP and Speech Recognition.

Script

Output

The example demonstrates how to make a QR Code reader.

Script

Output

The example demonstrates how to make a QR Code reader in the Python Coding Environment.

Code

sprite = Sprite('Square Box')
qr = QRCodeScanner()

qr.video("on flipped", 0)
qr.disablebox()

while True:
  qr.analysecamera()
  if qr.isdetected():
    sprite.setx(qr.xpos("center"))
    sprite.sety(qr.ypos("center"))
    sprite.setdirection(qr.angle())
    sprite.say(qr.codedata())
    sprite.show()
  else:
    sprite.hide()

Output

All articles loaded
No more articles to load
Table of Contents
[PythonExtension]

Get in Touch!