Activity: Making an Expression Detector
Making a Robo-Pet – Overview
Now it’s time to make our AI Robo-Pet! The robo-pet should recognize the face, match it with the stored face, and if the face matches, it should follow the face.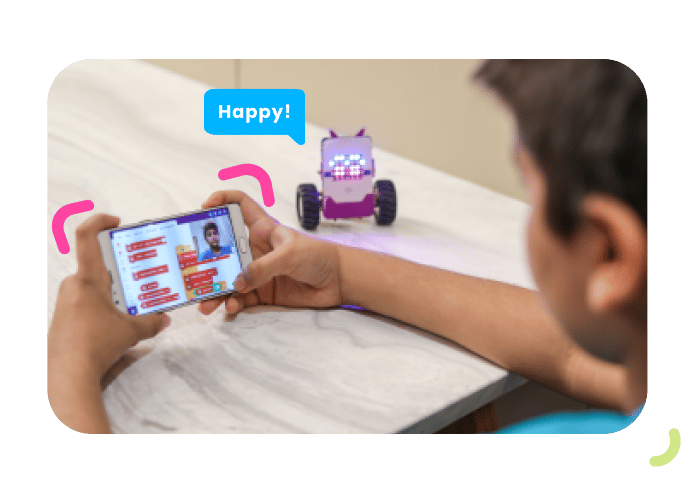
How? Let’s have a look!
Understanding the Logic
We want our robo-pet to follow our face. For that, we need to define the ranges of our motion. Let’s define them.
If the x position of our face is less than -100, it means our face is on the extreme left. Therefore, our robo-pet should also move left.
If the x position of our face is greater than 100, it means our face is on the extreme right. Therefore, our robo-pet should also move right.
If the width of our face is less than 200, it means that our face is far away from the screen. Therefore, our robo-pet should move towards us.
Now, it’s time to code our robo-pet!
Let’s Code!
We will continue with the script we made for matching the face.
- First, make a custom block. Go to the My Blocks palette and make a block named Face Matching.
- Next, replace the when flag clicked hat block with the Face Matching hat block.

- Till now, we have made the script to store the face and then match it. Now, it’s time to make the robo-fun follow our face once the face is matched. Thus, place a when flag clicked hat block from the Events palette into the scripting area.
- To make the face recognition more visible we’ll be showing a bounding box around the face of the user. But at the start of the script there should be no bounding block, thus from the Face Detection palette add () bounding box block and choose hide from the drop-down.
- Next, we will match the face, thus, drop the Face Matching stack block.
- Once the face is matched, we need to show the bounding box, thus drop () bounding box and select show from the drop-down.
- As we are working with the vertical robtot, we need to set the orientation. Thus, from the Robot palette, place set robot orientation as () block and select vertical from the drop-down.
- Place a forever block from the palette.
- Next to analyse the face, drop the analyse image from () block and choose camera.
- Now, let’s make the robo-pet follow us. Add an if-else block.
- Then, in its white space, add a () < () block from the Operators palette.
- In the first space of the () < () block, add a get () of face () block from the Face Detection palette. In the second space, write –100. If this condition is true, then our robo-pet should move left.
- Go to the Robot palette and drop a go () at () % speed for () seconds block under the if arm. Let the speed be 100%. Change the direction to the left and set the time to 0.2 seconds.
- Next, add another if-else block under the else arm of the first block. In the space of this if-else block, drop a () > () block.
- In the first space of the () > () block, add a get () of face () block from the Face Detection palette. In the second space, write 100. If this condition is true, then our robo-pet should move right.
- Go to the Robot palette and drop a go () at () % speed for () seconds block under the if arm. Let the speed be 100%. Change the direction to right and set the time to 0.2 seconds.
- Now, add an if block under the else arm of the second if-else block. In its white space, add a () < () block from the Operators palette.
- In the first space of the () < () block, add a get () of face () block from the Face Detection palette and select width from the first drop-down. In the second space, write 200. If this condition is true, then our robo-pet should move right.
- Go to the Robot palette and drop a go () at () % speed for () seconds block under the if arm. Let the speed be 100% and the direction forward. Set the time to 0.5 seconds.

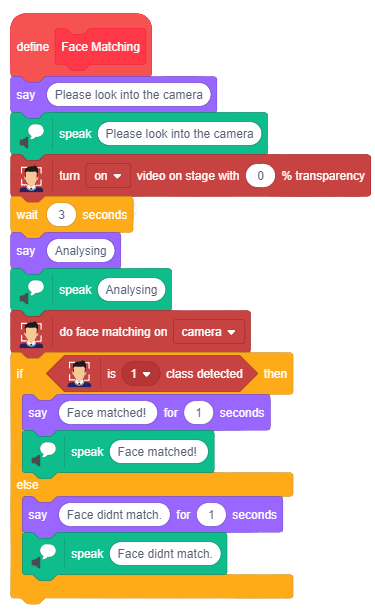
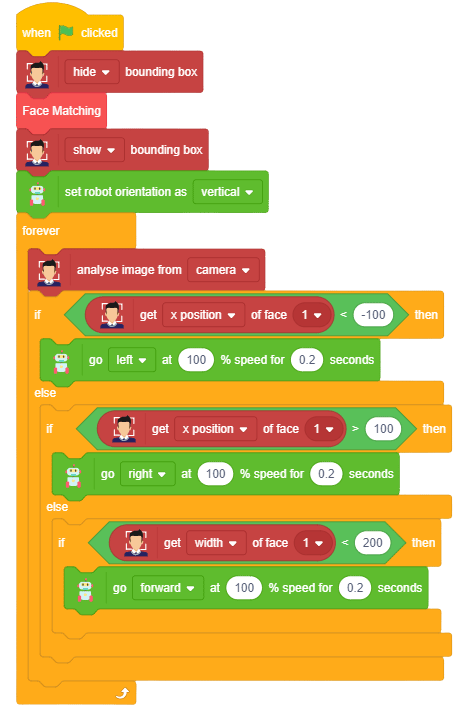
Now, run the script by clicking the green flag and enjoy!
With this, we’re now familiar with artificial intelligence basics and face recognition! Let’s recap the lesson before moving on to the next.
What We Have Learnt
In this lesson, we had some fun with face recognition wherein we made our face recognition system. Finally, we made our very own robo-pet using Quarky!